Sunday, August 21, 2005

How I Set up My Shortcut Bars and User Interface

So, Jim took a look at some of my screenshots and asked a few questions about my user interface (UI) set-up. I think I have a pretty good set-up, and have been meaning to discuss it with people (not the actual spells, just how I set up the bars). However, it's hard to discuss in in-game chat, and I think Tony & Michael are the only ones who have been to my house, so I thought I would take some time to explain my UI and hotbar set-up.

To make this easiest to follow, I would suggest right-clicking on the appropriate picture and choosing "Open in New Window" (that's for Explorer, but Netscape has something similar. That way you can Alt-Tab back and forth between the description and the enlarged image to see what I'm talking about.

First up is my basic set-up for Laila, which I will use for most of the descriptions in this post:
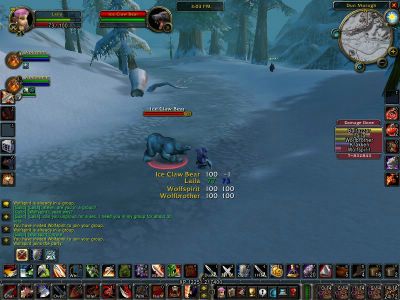


I am going to start by talking about the set up of the bars themselves, as well as the hotkeys I use. Then I will talk about the skills that I put into each bar.

BAR SET UP


I use 5 bars, plus the "shape change" bar (I know it looks like more, but we'll get to that).

1) Action Bar:

The first bar is my normal action bar, in the very lowest left corner of my UI. We all have this, and, in fact, without a special UI modifier (like Cosmos), you can't get rid of this. I use the default key bindings here, which are 1 to = (that's 1 through 0, plus the "-" and "=" keys). I am sure all of you use it the same way. For this discussion, I will call this my "Main Bar."

Remember that there are 6 different bars that you can scroll through in this area, by clicking on the arrows to the right of the bar, mousewheel or by using the shortcut keys (default are shift+1 to shift+6, although I will suggest changing those in a second). However, for me, I rarely ever change this bar. The only time I do is to switch to bar 2, where I keep profession skills (smelting, smithing, cooking and first aid). I will also ocassionally stick a macro button that I rarely use on bar 2.

2) Bottom Left Action Bar

A misnomer if I ever heard one. What Blizzard calls the "Bottom Left ActionBar" is actually the "middle" bar on the left side - the bottom is the "ActionBar" the top (small icons) is the "Shape Shift Bar" and the middle is called (by Blizz) the "Bottom Left ActionBar." Why is this important? Because, if you go into Interface Options to turn this bar on, that's what they call it. For my UI, I use the standard WoW bar from interface Options. For purposes of this discussion, I will call this my "Second Bar."

I bind the slots of this bar to the keys Shift+1 to Shift+=

3) Shape Shift Bar

The top bar on the left is the "shape shift" bar. Of course, for warriors it is stances (not shapes), for pallys it's auras, etc. I think this is also where the the Pet bar appears for warlock and hunters.

4) Lower Right Bar

Blizzard offers an option to add a bar to the lower right. However, I prefer to use PopBar, because I add a second row. More on this in a minute. I bind this bar to Ctrl+Shift+1 to Ctrl+Shift+=

5) Side Bar

Blizzard offers an option for a side bar, as well (I think they call it Right Bar). In fact, Blizzard even allows you to put 2 rown on the right side, with 12 buttons each. However, I find both the 12 box rows and 2 bars on the right to be very distracting, as well as interfering with open bags. So, I prefer to use the SideBar Addon. It allows a row on the left (which I prefer) and more flexibility in terms of number of boxes, etc. (I use 6 on each side). I bind these to Alt+1 to Alt+6 on the left side and Alt+7 to Alt+= on the right.

6) Pop Bar Row 2 (Hidden)
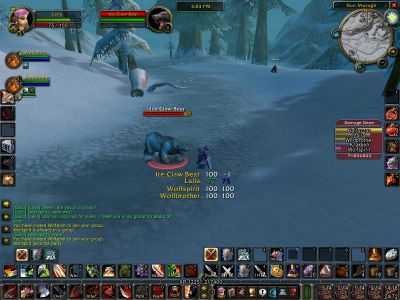


I have one other bar that sits atop my lower left bar. It remains hidden, unless I mouse over it, the it appears (as seen in this picture). This is one of the features of PopBar - you can add up to 12 rows of bars with as many columns as you want (up to 12). I use only 2 rows of 12 buttons each.

I bind Shift+Alt+1 to Shift+Alt+= to this bar. I will refer to this as the "hidden bar."

7) Other Key Changes

As I said before, the default key bindings to change the Main Bar is Shift+1 to Shift+6. However, I prefer to use the Shift+ keys for my second bar. Therefore, I have bound Ctrl+1 to Ctrl+6 to change "pages" on the Main Bar. There are options (I forget if Blizz offers this or only the Add Ons) to allow you to have other bars change when the main bar changes. However, I find that I prefer my pages to stay static (and, as I said previously, I rarely change the main bar, anyway).

8) Shape Shift = Change

One other note, with warrior, druid, and probably some other classes, page 1 of the main bar changes when the character changes shapes. Only the main bar changes - the others are static. The idea behind this is to allow the player to put skills limited to one or a few shapes only on those pages/shapes that can use those skills. However, I find building different pages for different shapes confusing. What I do, instead, is put the same skill in the same slot for every shape page (for warrior there are 3 "shapes" - Battle stance, Defensive stance and Berserker stance). But, on those shapes/pages where a skill won't work, I bind either a macro or a shape change command to get me back to a shape that allows me to use the skill.

For example, in slot 6, I have a macro for my Intercept skill. Intercept only works in Berserker stance. The macro first checks whether I am in Berserker stance. If I am, it executes Intercept. If I'm not, it puts me in Berserker stance. In other words, If I am not in Berserker stance and want to intercept, I just push the button twice - first push puts me in Berserker Stance, second push executes the skill.

As a second example, in slot 5, I have the Execute skill. Execute only works in Battle or Berserker stance. However, rather than writing a macro for this, I have taken shortcut. In the Battle and Berserker stance bars, I have the execute skills. However, in the defensive stance bar, I have the power for change stance to Battle stance. This has the same effect as the macro - 2 pushes - 1 to change stance and the second to execute Execute (hehe), but it is accomplished without having to write a macro. The difference? With a macro, I get the same picture (I use the picture that matches the skill for my macros) in all 3 bars. Without a macro, I get a picture of the skill in the bars where the skill works and a picture of the shape change in the bars where the skill doesn't work. This is not a problem, provided you KNOW which skills are in which slot.

ASSIGNING THE SKILLS


Now that you know how I key my bars, I turn to how I organize my skills. The first section was about the technicalities of how the UI works, this section is about my preference for how I want things organized.

1) Primary Skills

I want my main skills to be (literally) at my finger tips. I don't want to have to look down to acces skills either (there is enough to look at on the screen without losing time looking at the keyboard). I play on both a desktop and laptop computer, and my keyboards are laid out slightly differently, but my set-ups are made with the same intention.

I normally keep the fingers of my left hand sitting on Q W E (incidentally, I have rebound my movement keys, so that Q and E are turn and A and D are "straff" - the blizz default is the other way around), if I need to move, or 2 3 4, if I am in battle and don't need to move.

I put my main battle initiation skill on the 1 key. This is the skill that gets me into battle, but which I don't push much once I am engaged. For most characters, this is probable the attack skill, and this is the skill Blizzard defults in slot 1. However, for the warrior, as you can see, I have put Charge in slot 1, since I enter 80% of battles with a Charge.

After the intiation skill, my primary skills go into slots 2, 3 and 4. In the case of the warrior, these are sunder armor, Mortal Strike and Overpower. With my fingers on 2 3 4, it becomes very easy to mash these repeatedly as needed, without ever having to look at the keys. My next most common move goes into 5 - an easy press from the 2 3 4 position. For warrior, I put Execute in 5, which is a battle ending move (it is only available when the mob have less than 20% health and does substantial damage).

2) Secondary Skills

My primary skills, on both of my characters, make up probably 75%+ of all button pushes. However, my secondary skills are very important (especially in groups) and must be readily accessible. I put these skills in a couple of places.

First, common secondaries go into Shift+1 to shift+5. These sit directly above my primaries on the screen, and I can easily reach a pinky (or my right hand) to hit shift and execute secondaries without looking at the keyboard. Less common secondaries go into the Alt+1 to Alt+3 slots, as needed. For instance, I like to put "uber" moves (the ones with 30-to-60 min cooldowns) into the Alt slots.

The second place for secondaries is on the "right side" of the keyboard. That is, the 0, - and = keys. I find these are easily accessed by either right or left hand with a quick glance at the keyboard - once my hand is there, it can stay there and quickly execute a number of skills without re-looking at the keyboard.

The third place for secondaries is in the "nearby keys." For instance, I previously explained that my "finishing move" Execute is in slot 5. However, it only works at close distance. Intercept is also a sort of finishing move, and is used when a mob moves away. So, I bind it in slot 6. If I reach for 5 and it fails for distance, it is easy to get to 6, without looking at the keyboard (anyone sensing a theme)?

3) Grouping

The next most important aspect of arranging my skills is "grouping" the skills. When I'm fighting, I want to know where everything is, so that I don't have to think about where skills are or what those little pictures mean. All characters have dozens of skills, and there are some we rarely use, so I use grouping to help me avoid having to think about what skills do.

For example, Taunt, Mocking Blow and Challenging Shot are all skills that cause mobs to stop attacking someone else and focus on me for a time (commonly called taunt moves). I have Taunt in slot 0, Mocking Blow in Shift+0 and Challenging Shout in Alt+0. As another example, Demoralizing Shout and Piercing Howl both affect groups of monsters. I have them bound in - and Shift+-. Also nearby is Battle Shout in slot =. Although Battle Shout affects our party instead of enemies, shouts are off-cycle moves, and I tend to throw 2 or 3 of them together in groups. So, again, easy, no looking at keys, not much thinking (well, I can limit thinking to what I want to do, not how I do it).

4) Other Skills

Other skills go where they must. I try to figure out a logical place to put them, but some of them just go into a slot that's not yet taken.

5) Buffs and Such

I tend to put my buffs, bandages, potions, sharpening stones and similar skills/items into my third bar on the right side and drifting into the middle.

6) Important Macros

On the left side of my third bar, I keep important macros. In the case of the warrior, I have 4 macros to switch weapons (from 1-hander to dual wield, from dual to 2-h, from 2-h to 1-hander + shield, etc.). For a warrior, well for me anyway, this is CRITICAL and time-sensitive. By the time I have to grab my shield, if I have to open a bag, look for the shield, or think about it in any way, I'm already dead. One key and I've got it. I use these a LOT.

7) Non-skills that I use a lot

There are certain non-skills that I use frequently. Most importantly, call mount, call kitten, and turn on scanning (mineral scan, etc.). I tend to bind these into "middle" Alt keys (in this example, Alt+4, Alt+5 and Alt+6). So, they're always handy, but not taking up the most critical slots.

8) Hidden Bar

In the hidden bar, I put other not-often used skills and non-skills. In the warrior example, I have 3 shape changes (these are critical, but I rarely shape shift without using a macro, so I have other keys I can rely on for this), call chicken with the "Thunderchicken Hooooooooo!" macro (so pressing Shift+Alt+5 shouts, and Alt+5 does not), and I bind my Hearthstone into Shift+Alt+=. These are a few other items that I bind here from time to time. These are the types of things that I don't want to have to open a bag for, but also don't need to have on the screen all the time. Because some of these change often, I sometimes access these by mousing over the bar, rather than using the shortcut keys.


BRING ON THE PALLY

As a quick comparison, I have also included a shot of my pally set-up (this is a couple weeks old, so some skills are missing).
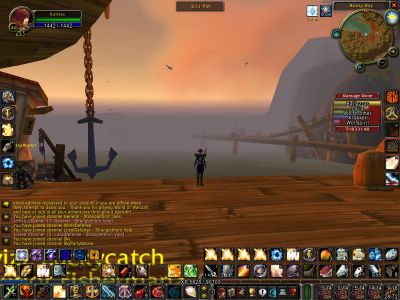


The concept is the same - initiating move in slot 1, most common moves in 2 3 4 then 5, as well as Shift+1, Shift+2, Shift+3, etc. A couple of quick notes.

Grouping Part 2

The other thing I like to do is group move "sets." In this case, my most common seal move is Crusader, judge, Command. I have bound these, respectively, to 4 3 2. So, I head into battle, hit 4, hit 3, hit2, and I'm whooping ass. For healing, I have a sequence bound to Shift+2, Shift+1 and the `/~ key (which is just left of 1). So, again, I can hit these 3 keys in sequence.

"Obsolete" Ranks

Most skills become obsolete when they aren't the highest rank of the skill. However, healing is mana dependent, and sometimes you have enough mana for Rank 3, but not rank 5. So, I bound "obsolete" ranks of healing spells into the hidden bar. That way, if I don't have enough mana for the top rank heal, a simple mouseover shows me how much healing I can do (I have reconfigured how my spells are placed, but it's the same concept as you see here).

WHAT THE HELL IS THE REST OF THAT STUFF?


Okay, so now you know how I set up my bars. I want to talk for a second about a couple of other UI AddOns I like to use. (There are more visible on the screen than the two I want to discuss, so, if you have other questions, let me know).

1) Damage Trackers

I like to use a damage tracker. It lets me know what kind of damage I'm doing, and the same for other members of my party. In these pictures, I am using Damage Meter - the red box near the right side of my screen. Since these pictures, I have changed to recap, which is a more powerful program. However, both of them give you plenty of information.

2) Party Monitors

In both of the Laila pictures, I have a Party Monitor on in the middle of the screen. The monitor tells me the status of all party member's health and mana (as a percentage) as well as the health and mana of the mob I'm fighting. I don't use this often, but it can be helpful in tough dungeons or when I am playing a healer, since all party member info is right in the middle of the screen and easily readable.

SHRINKAGE


One more thing, and then I'm done. Blizz offers an option (in Interface Options) to reduce the UI. I have included a picture of Kall's screen with the UI at about 75%. As you can see, it makes more of the world visible, but the buttons are less visible. If you know your button set-up well, this is an easy way to see more of the world around you.
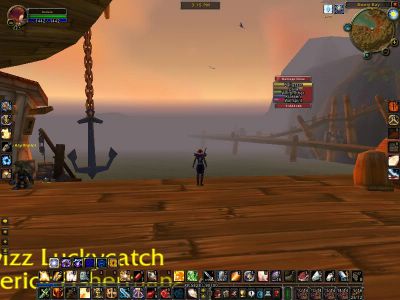


Well, that's about it for now. As I mentioned briefly, there are many other AddOns that allow you to tweak you UI in many ways. For instance, I use an AddOn that shows empty bag slots (visible in these shots), one that allows me to move frames (the char frame, vendor frame, auction frame, etc) around on the screen, and AddOn that allows me to display the key number in every slot of every bar (these did not used to be visible in any bar other than Main Bar, and I think that is still true without an AddOn), etc. Maybe someone will do a post about favorite AddOns in the near future.

In the meantime, as always, if you have any questions about this post or my UI, just let me know.

Saturday, August 20, 2005

Here Come the Guides

I want to do a series of primers on combat techniques on WoW. Many of these will be familiar to the "higher level" players, because we have been honing them across many months on WoW, and, in fact, on numerous games before WoW. However, it never hurts to reiterate, just to make sure that we are all on the same page.

So, I am going to start. However, anyone should feel free to post their own guides. And, furthermore, if someone disagrees with me, they should feel free to say so. If we are going to have a strategy, then we all need to make sure we understand it and are using it. If someone disagrees with the strategy, that's fine, but, in a 5-man, high-level instance, if 4 people are running one strategy, and the 5th is running a different one, that's a sure recipe for disaster.

As for myself, most of my strategy guides will be based on a combination of experience + logic. You should be able to distinguish between which is more heavily weighted by (1) the subject and (2) how I say things. In other words, if I write about warriors, you can bet that it's mostly experience, but, if I write about healing techniques, it may be more based upon logic. Also, in my guides, I will try to "reveal" secrets and tips that are in the game, but that a lot of people may not know about. For instance, shortcut keys or macros. At some point, as I have been promising, I will also adress some advantages of various Add Ons and User Interfaces.

So, let me begin with the first guide, which is on selecting Mobs ...

Selecting Mobs

Any combat strategy that we come up with will largely revolve around (on the offensive side) who we attack, how we attack them and when and (on the defensive side) who we protect/heal and when and how. In order to implement any of these strategies correctly, you have to be able to actually target the mob1 or party member that you're supposed to be attacking or protecting. Spending time clicking around for a target (or clicking on the wrong target) is lost time, and can mean the difference between victory and death.

WoW offers a very simple and intuitive way to select targets: left-click to select, right-click to select+action (the primary action being attacking, in the case of a mob). Unfortunately, as we all know, this method is simple in theory, but often complicated in execution. The screen is too crowded with players and NPCs to select accurately, the target is too far away or at too much of an angle, the target is around a corner, etc. - all of these lead to problems in selecting targets.

After a successful run through ZF the other night, including retrieving the Divine-o-Matic Rod, LilLordHelen sent me the following e-mail:

Can you tell me how you select mobs to attack, especially when 9 gaziliion come at the group like last night? Even when it was just 2 or 3 mobs, I had trouble figuring out which one Wolfbrother was taking care of and which one(s) the rest of us were fighting. My screen just becomes a huge jumble of character names and mob health levels and mosh pit animated bodies. Your trick helped a lot, but I still felt like I was idle a lot of the time either figuring out who to fight or trying to get back in front of the mob I was supposed to be thwacking.
I think we have all felt like that at one time or another. So, working on the assumption that right-click, though easy, is not the most effective way to select targets, here are some tips and tricks.

THE BASICS

1) Tabbing

The simplest way to select hostile targets (red) is by using the Tab key. Tab once to select the nearest target (within line of sight - unlike some other games, which will also select targets behind you). Tab again for the next closest target, etc. Shift-Tab goes "backwards" through targets from furthest to nearest. Because tabbing automatically selects the closest target, this can be a great way to distinguish which mob is closest when you can't quite tell from just looking at them.

While it's easy, it does have its problems. First, whatever code Blizzard is using is not perfect. Sometimes you get a target, sometimes you don't. I've run dozens of tests to try and determine why it works sometimes and not others, and I have no clue. So, it's not perfect, but experiment with it, and you'll get a feel for it. Second, it is distance limited. So is clicking, but clicking works at a greater range than tabbing. Blizzard has tried to hard to eliminate exploits, that they have come up with some dumb stuff like this. Oh well, you just have to live with it.

The most important limitation of tabbing, as far as I'm concerned, is that tab = a left-click. In other words, you select a target, but you do not activate attacking. In other words, if you tab select a mob and then run up to it, it will attack you, and you will stand there idly being beaten upon. So, you have to remember to activate attack. The default attack button is 1 (and it will still be for most people, unless you move it, as I do). So, Tab, then 1, selects a mob and puts you in attack mode, just as if you'd right-clicked. Many classes also have other skills that will put them into attack mode (such as the Charge skill for a warrior).

2) Just attack

Once a mob engages you in contact and actually hits you (it doesn't happen until they hit), they will automatically be selected as your target. At that point, all you have to do is attack (see above). This is true whether they’re behind you, chasing you, on the other side of a wall or whatnot. No need to mess around with pointing and clicking, just attack (of course, you still may need to turn or go around the wall for certain attacks to work). Why is this helpful? Well, I use it in 2 situations.

(A) When I am running (through an area or away from battle), as soon as something hits me, it is selected as my target. I can attack it, whether I can see it or click it or not. If you have spells that attack behind you, you can start attacking without ever turning around. For example, if my pally is running, and something attacks me, I hit my “Hammer of Justice” skill and stun them 5 secs. No muss, no fuss. I just keep on running and they are frozen in their tracks.

(B) When I am fighting multiple mobs. We’ve all been there. You’re fighting 2 or 3 (or 8) mobs. You drop one, and you must start attacking the next. Time is of the essence, but you end up scrolling around and clicking with the mouse trying to select something. 2 secs can often be the difference between victory and death. Well, using this technique, there is no need to select a mob – they “select you.” As soon as you drop the first mob, just hit the attack button (or another attack skill) and you’ll start going to town on the next mob. For tanks or anyone trying to control a crowd, this is critical knowledge.

GROUPS

Soloing and fighting with a group require very different techniques. It is not difficult to select a target in 1-on-1 or 1-on-2 situations, but, as Lil said earlier, in 5-on-5 or more, the screen gets crazy. So, here are some techniques tailored to group situations.

Also, keep in mind the “just attack” tip which I gave above. This is VERY VERY useful when your screen is full of friends and foes. Sometimes it is not as important who you attack, as long as you are attacking someone, so let the target select you, and then unleash hell on him!

3) The V Key

This goes directly to Lil’s point about not being able to tell who was attacking whom (and it is my fault for not explaining it to him the other night). WoW has a feature called “Show Name Plates.” Name plates are things like “Fruit Vendor” or guild names. By default, this feature is set “on” (in fact, when you log out and back in, it resets to “on”), and the default key is V. I think “Show Name Plates” is a terrible name, though, and I prefer to refer to this as the “health bar toggle” – because, when you toggle name plates “off” you get a health bar for all NPCs. In town, this can be incredibly annoying, but in a group fight, it’s critical – you must have the health bars showing.

Want to know which mob is closest to dying? With health bars showing, this is easy. Want to know whom everyone else is attacking? With health bars showing, you can easily figure it out because the health of one mob will be dropping very quickly. I will get into combat techniques in a later post, but, for discussion purposes here, the BASIC attack technique is (a) everyone on 1 mob and (b) attack the weakest first.2 There are many exceptions, but this is a basic technique. With health bars showing, it’s much easier to tell which mob everyone is attacking and (when that one dies) which mob is the next weakest one to attack. When there are “exceptions” to the rule, you will also need health bars to figure out how to apply the exceptions. So, health bars on in any kind of multi-mob situation.

BTW, another good tip: When the health bars are on, you can select a mob by clicking on the health bar. They kind of move around, so you can’t always tell which bar goes with which mob. But, the bars are easy to target with the mouse, and it’s easy to right-click the one with the lowest health.

4) Names

I guess it’s great that people have names over their heads in most situations, but, when you’re traveling in a group of 5 friends, shouldn’t you pretty much know who people are? I mean, yeah, Wolfbrother and Wolfspirit look similar, but one of them fires a gun and one swings a big sword. I can tell who is who without name plates. Go into “Interface Settings” and uncheck Player Names” to clear up some room on your screen. Also, if running with a hunter (or a kitten) uncheck Pet Name Plates” – we all recognize Hopper by now, right? Once you’re out of the dungeon, toggle names back on. And, if you think this means that it makes it harder to select your friends during combat, then you need to know about …

5) F1 – F5

Some of the most important keys in combat, F1 – F5 (default) allow you to select the members of your party. F1 is you, F2 is the first party member, F3 is next, etc. So, if I need to heal myself in combat, I hit the heal spell and F1 – I don’t click on myself, I don’t click on my portrait, etc. Keys are always faster and more accurate than clicking. When I have to buff a whole party, I do F1, buff, F2, buff, F3, buff, etc. Know these keys!!!!

6) Assisting – aka The F key

OK, this is where it gets really good! WoW has a feature called assist. There are a number of ways to invoke it, the most common being /assist (in chat window) and the F key (there are also add ons that improve assist functionality, but they are somewhat complicated, and no good unless everyone in the party is using them). Assist allows you to help someone out (just like it sounds). So, let’s say it’s me and Baltazzar against 5 mobs – the only way to win that fight is by coordinating our attacks and taking them 2-against-1 (2 of us against 1 of them). For whatever reason, I can’t tell from the health bars (or don’t have time to determine) which mob Baltazzar is attacking. I select Baltazzar (F2) and then assist (F) – this puts me on Baltazzar’s Target!!!

So, this is the answer to Lil’s question – can’t tell what mob everyone else is attacking, select one of them, then F, and you will automatically be on the same target. This is also great before combat. For instance, when Wolfbrother uses one of his skills to select a target way off in the distance, or when I know that Wolfie and are need to be on the same mob, instead of trying to click around, I just assist Wolfie. Voila! This works “in reverse” too. When Balt is going to sap someone, meaning that I don’t want to attack that target, I can “assist” Balt to get his target, and then Tab to the next target to make sure I don’t accidentally hit the sapped target.

AND SO

So, now I’ve given you a lot of different ways to select mobs (and party members) to make things run more smoothly in very mobby situations. As for myself, I would say that 90% of the time I target mobs by toggling health bars on (Name Plates off) with the V key, and then selecting mobs by right clicking on their health bars. Since I am scanning the bars anyway, to see which has the lowest health, it’s very easy to just go ahead and click the bar that I want to choose next. And, like most things in WoW, I use “anticipation,” which is to say that my mouse is “hovering” over the next bar that I’m going to click well before it’s time to actually click it. For party members, 95% of the time, I use F1-F5.3 The rest of the time, I use a combination of the above techniques for selecting mobs and party members.

If anyone has any other tips or comments, please post them as a comment or e-mail me and I will add them.

- Later, Laila


Footnotes:

1 Incidentally, for anyone wondering, the term "mob" is an old acronym for "monster or beast." It comes from some of the oldest online RPGs - the term actually has nothing to do with the propensity of hostile NPCs to attack in groups, although you wouldn't know it sometimes.

2 Deviating from this rule causes all kinds of problems, including allowing mobs to live longer and deal more damage, not to mention pulling hate away from a tank and onto yourself.

3 I wish there was a way that I could rearrange the party members into an order that I like, but I can’t seem to figure that out. In fact, even the order that I invite members into the group doesn’t seem to work. If anyone knows of a way, please let me know. I suppose I could reassign shortcut keys so that, for instance, Baltazzar is always F2, regardless of his “position” in the party, but this has its own shortcomings.

Monday, August 08, 2005

Links

I will be adding general, and generally important, links to the right side bar of the website. The first four I have added are:

1) Official Warcraft Forums - 'nuff said

2) A list of maps and walkthroughs for instances published on different sites, with links

3) That Profession FAQ that we have all used from time to time

and 4) The IGN Talent Calculator

Feel free to add your own links or ask me to add them, but let's try to keep them of a general nature and generally useful to all (or at least most) of the members of this list. If you want to post something more specific, like a link to warrior builds, do that in a normal post. These will be our persistent links, so let's try to limit them to things that will be used often and by most people. Also, unless people think it's necessary, I'm not going to add any overly general links like a link to the homepage of Thottbot, since I think most of us can find that. But, if you think I should, just let me know. There is (as far as I know) no limit to the number of links we can post.

Sunday, August 07, 2005

Hunters Corner - The Pet


As HoS' highest ranking hunter, Wolfbrother has his work cut out for him. The hunter class is a interesting blend of archer and beast master, which makes for challenging play. This column is dedicated to things picked up along the way about hunters and they're role in groups.

Pets, Gotta have them!

Attack, Follow, Stay, Claw , Growl , Bite , Cower, Aggres, Defense, and Passive

  1. The primary pet skill is growl. This is a taunt that is supposed to keep attention on the pet, allowing the hunter (and others) to kill the target at range. Training is from a trainer.
  2. Additional skills include: Claw, Bite, Cower, and Dash/Dive. All are learned from tamed pets; meaning you tame a beast with the skill, then you fight along side it and you learn it. You then can train another "pet" with the skill.
  3. Bite Rank 1-8, name says it all just at varying damage levels by Rank. Each Rank is available on different animals. (there is a site that lists what animals have what)
  4. Claw Rank 1-8, same as bite.
  5. Cower Rank 1-4, (I Think) this is a threat reduction tool, its to try to save your pet when he's in over his head. I don't use this skill, because generally by the time you notice the problem the cure won't change the outcome...
  6. Dash Rank 1-4, This is "super speed" for pets. This is handy in pet pulling (more on that later) and for intercepting fast-closing mobs on gun pulling. Plus, in advanced use, very handy for scouting using the Eyes of the Beast skill.
  7. Dive Rank ?-?, this is the same as Dash, as far as I know.

In the above photo you can see "checked boxes" above all the special skills. This is a feature of SmartPet which is a UI mod. It auto manages my pets focus to try and always keep growl available. Focus is very similar to a Rogue's energy bar, ie: no focus, no skill. I no longer have cower as a active skill, instead I have Dash in Cowers slot.

Pet Management

Solo- Very easy, Send the pet, let it establish aggro, kill target, heal as necessary, and set pet state as Defensive. Defensive means if your attacked, pet attacks.

Group- Can be tough. Alot of times I will disable growl (if there is a primary tank), it allows the tank to manage the aggro to his liking, and I set pet state to passive. This way a caster/shooter can't trip the pet before your ready to commit. If you jump down anywhere without clearing the long way first, your pet will aggro the world. This is bad. If its questionable, dismiss the pet before the jump. Or if the jump is long enough, have the pet stay and he will auto unsummon if you get to far away.

Pulling- This is one of the best uses for a pet in a group. Pets can pull from further away then a weapon can, around corners, and can abort a pull if it goes south (sacrificing the pet for the greater good). Sneak in, target the mob, back out to where you want to fight, send pet, when his avatar flashes and he takes a tick of damage click "follow", pet returns to you, have the pet reattack target at the range you want to engage the target at. If you pull a whole room by accident, have pet reattack, and run like hell. lol

Scouting- Using Eyes of the Beast you can take direct control of your pet and scout with it. This sounds kinda foolish at first, until you realize your pet has a much smaller aggro range than your character does, and with Dash is as fast (or faster) than a rogue for needful getaways. Two things to remember here.

  1. Your pet puts you in combat, if he's in combat. So if you end up fighting or fleeing while in Eyes of the Beast, plan on those mobs coming after YOU when the spell ends or the pet dies (whichever comes first) (real funny how I found this out). The way to break this is to turn the pet to fight, and at the conclusion to the spell Feign Death. Anything to break aggro.
  2. If your pet gets to far out and the spell ends, your pet will unsummon. Just whistle, he'll come right back.

Well thats a look at the Hunter Pet, the base animals used to have different stats but Blizz changed it, only real difference now is attack speeds (thats why you see so many white tigers).

Pet Questions? Leave them in comments

*Next Time- Hunter Skills*

Saturday, August 06, 2005

So You're Dead, Now What?

A few Harbingers showing that even death doesn't mean the end of fun. Thanks to Joe for the pic.

Pictured (L to R): Baltazzar, Wolfbrother and Laila, during a recent DM North near-wipe


Group Hearthing

One of the trademark HoS maneuvers is the group hearth. Line up on top of each other, hearth in synch, spin and jump. A classic ... and anyone else doing it is an imitator.

Last night was the first time I attempted to get a screenshot of the group hearth. Not bad, but I'll see if I can get a better one soon.

Scarlet Monastery Run

A group of 5 Harbingers made a successful run through the 3 main sections of the Scarlet Monastery tonight (choosing to skip the graveyard). 2 quests were completed by most of the chars, and a few good drops were picked up, including 4 or 5 blues. The group got some nice victory shots in the "mummy room"

Toons are (L to R): (back) Guldig, Momochan, Kalleie
(front) Wolfbrother, Mandragoran

Nice waving by SOME toons during photo.


Old Blog Located

Thanks to Joe, we have located the old HoS blog - which was, interestingly enough, called "Harbingers of Sarcasm." Unfortunately, we still don't know how to access it. Oh well, no matter, we have a new website now.

I am going to cut-and-paste a couple of the old entries. So, if you see entries that appear to be many months old, that's because they actually are.

Friday, August 05, 2005

The New Tabards Have Arrived

Check out the new look of our tabards!

The tabards were redesigned with 2 ideas in mind. When we designed the original tabards, the idea was to go for a "classy" and "classic" look, but then to slap a monkey on it - sarcastic, right? Well, it was. The problem is that our look (BTW, HoS was one of the very first guilds on the Hyjal server) was so "classic," that almost half of the guilds on the server use the same Maroon with gold colors. We just looked too much like the pack.

So, the first goal was simply to show that we are different. The new design, Royal Purple with black trim and gold logo, is still a classic look, but there is no other guild on Hyjal using it. To the Harbingers go the sarcasms.

The second (and related) goal was to make us more visible to each other. Whether running with guildmates in an 80-person epic PvP raid, or just looking for a guildie to buff you in IF, we should now be able to pick each other out from the crowd more easily.

I would like to thank Wolfbrother for all of the time he spent drumming up ideas and then sitting in the guild tabardrie with me running through designs (Anyone online last night and reading guild chat probably spent an hour reading posts that went something like: "Okay, now click to the purple 3 clicks to the left, with the rope border in white, and then blue 5 clicks to the right with chain border and tell me which looks better").

Hope you guys like them. Please pick up your new tabards at the ... well, actually, you don't have to pick them up at all. The design should change automatically.

See you online! Harbingers Hoooooooooo!!!!
Laila

(click on pictures to enlarge)


Kalleie Models the new tabard in Booty Bay


New tabard back

We're Back

We're back and better than ever. Somehow, the information for the old blog was ... ummm ... misplaced. So, we're just starting a new one. And, it coincides with the launch of our new tabard design, as well.

So, welcome to Harbingers of Sarcasm, Mark II.

Buff my Monkey!!!